Last weekend I did a long-overdue inspection of my Emperor Norton hive. The colony, which previously had been so vigorous, seemed to be struggling.
As soon as I lifted the lid off the hive I could see the problem. The hive had been infiltrated by wax moths and their destructive larvae.
I don’t have any photos because my camera was misbehaving. And honestly, a wax moth infestation is both difficult to photograph and disgusting in person. I wasn’t interested in struggling with my camera in order to photograph that mess.
There was also a thriving community of spiders in the hive box. The less said about that, the better.
I removed all of the larvae-riddled honeycomb because the bees were avoiding it. This left the bees with a snug home and significantly fewer uninvited guests
Over the course of the past week, Robb had cleaned the nastiest comb out of the frames I had removed from the hive. We saved what we could, which wasn’t much.
On Saturday, I added a box of clean frames to the hive.
I’m hoping that the colony will rebound, now that it’s not overwhelmed with destructive larvae and predatory spiders.
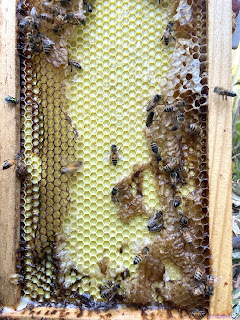
I always prefer to let my bees build honeycomb without using plastic templates. I find that the bees don’t favor the impenetrable walls of plastic, and would much rather make eccentric comb filled with little bee-sized doorways.
That comb on the left? It’s not riddled with wax moth tunnels. It’s exactly how the bees constructed it.
The problem with letting the bees build honeycomb without any guidance happens when the bees build their wax structures in a way that spans across several frames. When I move the frames inside the hive, the wax comb gets torn apart, which inevitably results in harm to developing brood or the bees themselves. It’s upsetting and unnecessary.
To avoid this, I’ll insert strips of embossed wax “foundation” in some of the frames that make up the interior walls of the beehive. This helps the bees get started building comb, and offers much more flexibility than a solid wall of plastic.
To make up for resources lost to wax moths, I let the bees scavenge honey from the other hive that had not survived the winter.
This photo clearly shows the yellow plastic foundation that neither the bees nor I particularly like. The bees have hardly built any wax structure on this sheet of plastic.
In contrast, here’s some of the honeycomb my bees built without plastic foundation.
The next step for me is to reclaim wax from old comb. I use a ridiculously simple method.
I clip multiple layers of finely woven cheesecloth into a metal pitcher which is partially filled with water. The cheesecloth is suspended above the water, and then the whole thing goes into a barely-warm oven. As the wax melts, any impurities are captured by the cheesecloth which acts as a filter. The molten wax floats on top of the water and as it melts I add more dirty wax comb.
Here’s the pitcher at the end of an afternoon of rendering wax.
Here’s all the gunk that was left behind in the cheesecloth filter.
The filtered wax floats on the water in the pitcher. When the wax cools down, it shrinks just enough that it can be popped out when I upend the pitcher
And here’s the final product. A half pound/240 grams of beautiful beeswax. It feels like satin, and smells absolutely heavenly.
This is much better than grub-infested, cobweb-covered honeycomb that even the bees wouldn’t go near.
It’s downright alchemical, turning something disgusting into gold.


Comments