How to Paint Gigantic Chintz
...

Let's say you woke up one morning, and said to yourself, "Self, I want to do a painting that looks like gigantic, oversized printed chintz fabric. I want the final product to be over twenty-five feet tall." How might you go about doing such a thing?
Well, if you were me, and you were in charge of painted scenery for a major regional theater, you would have to consider a lot of factors. You'd know that the final painting could not show a lot of brush-strokes, because that would not look "printed." You would realize that the painting would have to be built as multiple panels, because there's no truck (or lane of traffic) that could accommodate something this large. Breaking the painting up into pieces would be great for transport, but would mean that the image will have to be perfectly aligned, in order to not look stupid or amateurish. You would have to custom mix all of your own paint colors. And you would have to do all this on a really tight time-schedule.
Sounds like fun, doesn't it? Just my kind of project!
Here's how we did this painting for Berkeley Repertory Theatre.
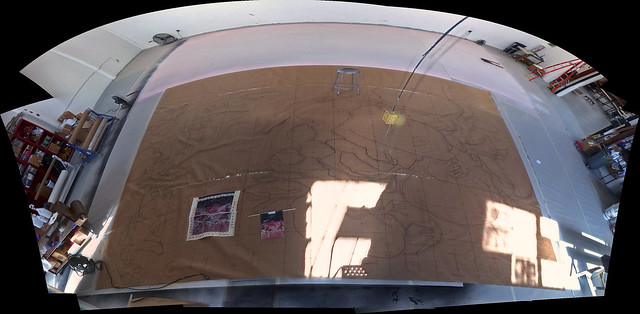
First, we drew the entire image (provided to my studio by the scenic designer Neil Murray) in full scale. We wrapped the original image in plastic, and drew a grid on the protective wrapper. We then set to drawing, using vine charcoal in bamboo holders. We used a pre-printed gridded paper, which we set up on the studio floor. We walk on our drawings and paintings, because nobody wants to spend the day crawling around on the floor.
Once we had all the flowers drawn correctly, we went over the charcoal lines with magic markers. We used a variety of colors, to indicate the different parts of the painting. After the image was "inked in" we perforated all of our drawn lines with a "pounce wheel" a traditional tool, not unlike the tool used for transferring sewing patterns. (Click here for an image.) The pounce wheel is a wicked-looking device with rotating needles that prick tidy holes in paper. Once we had our drawing perforated, we rubbed powdered charcoal through the holes in the paper, and transferred our drawing onto other surfaces. In this project, we used the massive perforated paper known as a pounce or cartoon for two purposes. We used it to transfer the master drawing onto the fabric that would become the painted backdrop. We also used the perforated pounce to create custom stencils, which I'll talk about shortly.
I'd like to mention two things: First, if you look at the top of the photograph of the drawing on the brown paper, you'll see a standard sized bar/office stool. That gives you some sense of the scale of this project. Second, if you're curious about the history of the pounce, here's a link that shows this exact technique in use on the Sistine Chapel.
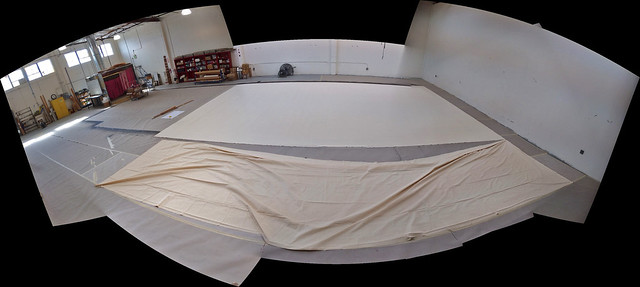
The next step was the preparation the fabric on which we would be painting. Because the image is so massive, we chose to lay the fabric on the floor of the studio. We just don't have walls tall enough to work on this size painting in an upright manner. Anyway, working on the floor has real advantages. You can reach any part of the painting without a ladder, and you're not fighting gravity.
I drew a series of boxes on our paper-covered studio floor. To be certain that everything was straight and even, I used the good old Pythagorean Theorem to ascertain the angles of my boundary boxes. I then stapled my fabric down to the floor, lining everything up with the boxes I'd just drawn. I had to keep even tension on the fabric to avoid wrinkles or puckering, so I stapled very methodically.

Next, I cooked up a five-gallon batch of cornstarch-and-water, to "size" the fabric, in order to make it a better painting surface. The "sizing" fills the weave of the fabric, which means that less paint will permeate the material. This in turn means that the final painting will be less stiff, less heavy, and less prone to cracking. I tinted the starch with some pink paint, so that I could see what I was doing. (Cooked corn starch is transparent, and it might as well be invisible.) Then I strained the starch solution through a paint strainer bag, poured it into a garden sprayer, and sprayed it onto my canvas. I built up many light layers, letting the fabric dry between passes. The starch tightened up the fabric, removing any hint of a wrinkle.
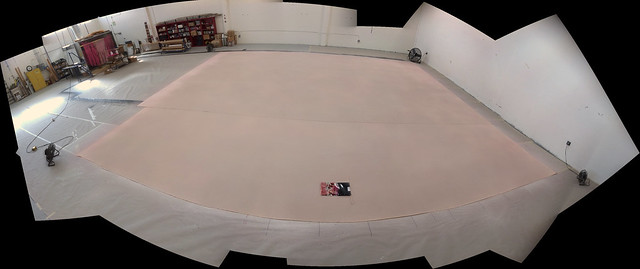
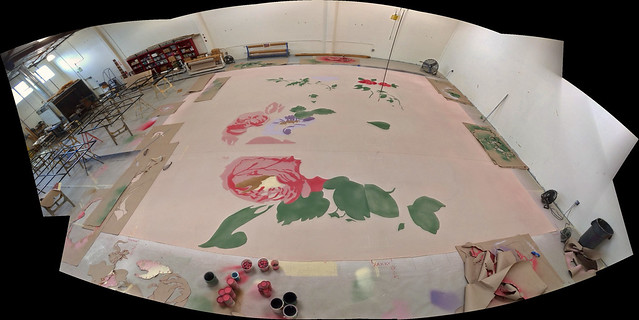
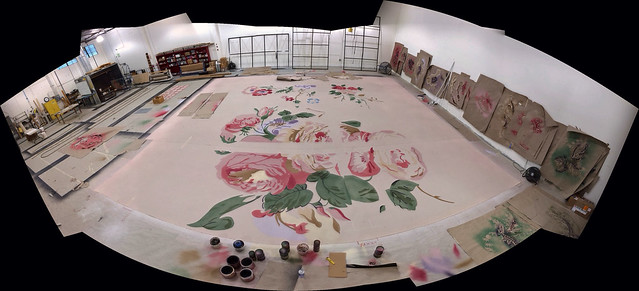
Next, I sprayed on several layers of custom-mixed paint, to build up the base layer of the painting. Again, I used a garden sprayer, of the sort you might use to apply fertilizer or insecticide in your home garden. The sprayer is like a gigantic air-brush, creating a beautifully smooth surface.
The object in the middle of the painting is the designer's model. Also notice the spray booth in the top left corner of the photograph. It is filled with gigantic hand-made "ostrich feathers" that are being treated with flame retardant chemicals. Our crew made over six hundred of these "feathers" out of custom-dyed fabric.

Color recipes were developed, based on the designer's original image.

The image was transferred onto the canvas, and paper stencils were created.

And then the real fun began! We started painting!
We'd line the stencil up with the charcoal image on the canvas, and then weigh the stencil down so that it wouldn't shift out of position. I used paint cans and those little glass "stones" used in flower arranging as stencil-weights.
I used a paint sprayer to apply the paint -- the kind used to paint automobiles. This worked beautifully with the paper stencils. I got a nice crisp image, and the stencils did not get over-saturated with paint.

We cut dozens of stencils.
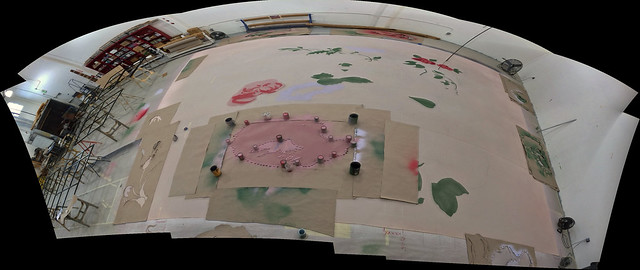
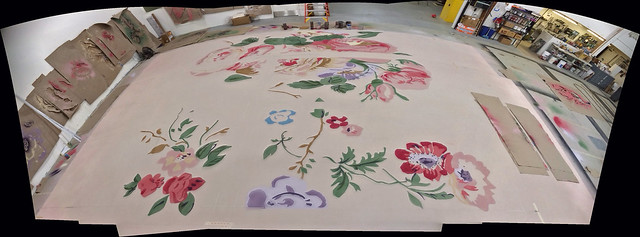
At first, the painting looked like a collection of undiffferentiated blobs, but eventually the images began to emerge.
And while we were working on this, we also had to paint the structures that the painting would be stretched on. See those metal things on the sawhorses on the left side of the photograph? Those were constructed by the carpenters in our scenic studios.
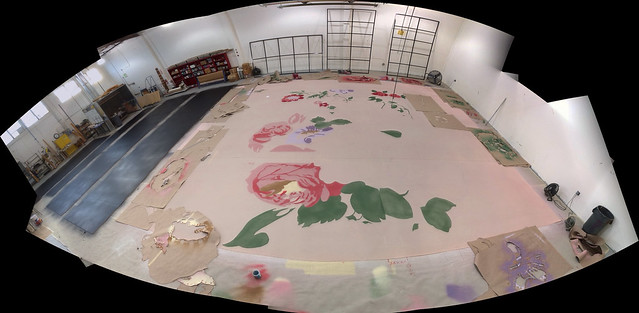
Once the steel frames were painted with a rust-proof coating, we then had to paint a bunch of floor panels for one of our two theaters. We're all excellent multi-taskers, because there's so much to do, and such a tight schedule to adhere to.
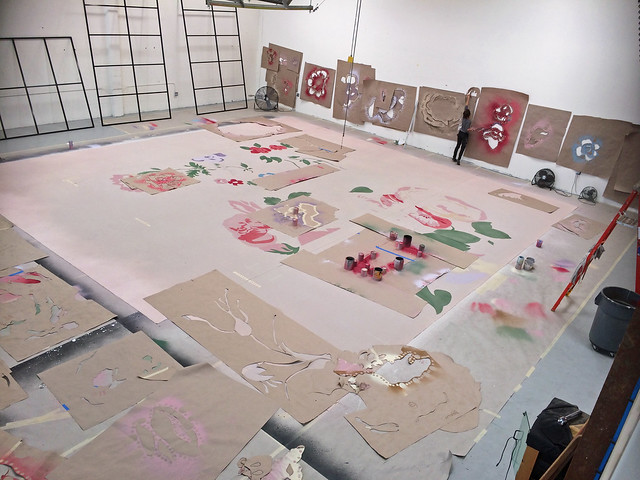
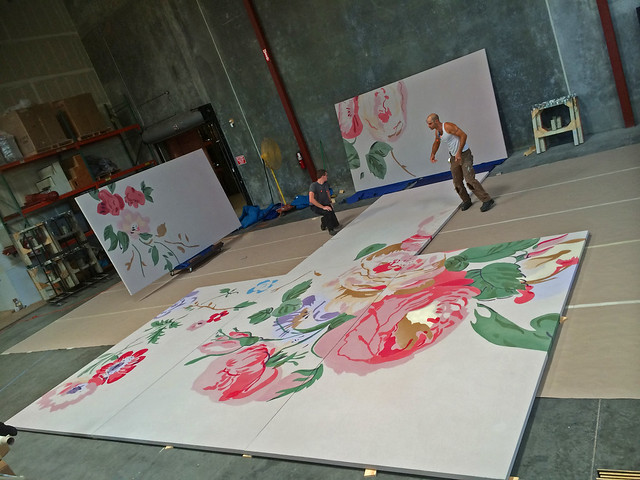
Here's another photo that shows the scale of the project. Can you see Anya, pinning used stencils to the wall for safe-keeping? We had to stay organized, or we would have drowned in a pile of stencils.
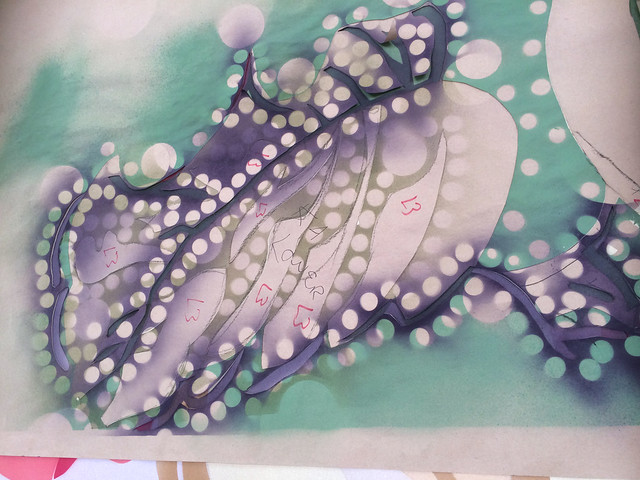
Stencils were used repeatedly, to create multi-colored images. This is one of the many leaves on the painting. The polka-dots on the paper stencils are made by the weights that I mentioned earlier. The big circles are the paint cans, and the smaller dots are where the glass "stones" were weighing down the paper stencils. Everyone who visited the studio while we were working on this project was quite taken with the physical stencils. They were very interesting objects in their own right.
Here's the painting, almost finished. At this point, you can see the places where the fabric will be cut to wrap around the frames. I put a huge amount of effort into making certain that the pattern would line up correctly. This was one part of the project that I found particularly nerve-wracking. That, and the fact that every bit of paint we applied to the canvas had to be perfect. This was not a project we could make any mistakes on. If we screwed up, there was no going back.
No pressure, there.
Here's a view from the other side. One of the things that made this project fun, and which made it look so much like printed fabric were the places on the original image where the printing was a bit out of "register." If you look at some printed fabrics, you'll notice that the layers of printed color don't always line up perfectly. Sometimes one color is just a little bit "off." On this project, we carefully copied the inconsistencies of the original fabric, given to us by the designer. Oddly, making mistakes on purpose is actually quite difficult. We naturally want to "clean up" mistakes. But if we'd corrected all the oddities in the original image, I think our giant version would have lacked both charm and authenticity.
Once the paintings were finished, and carefully removed from the floor, they were handed over to the carpenters who attached them to their frames. I was terribly nervous during this process, as it was another thing that had to go absolutely perfectly. I tried not to hover, and I'm sure I made the carpenters a bit crazy, but in the end there was nothing to worry about. The carpentry staff at the Berkeley Repertory Theater is the best of the best.
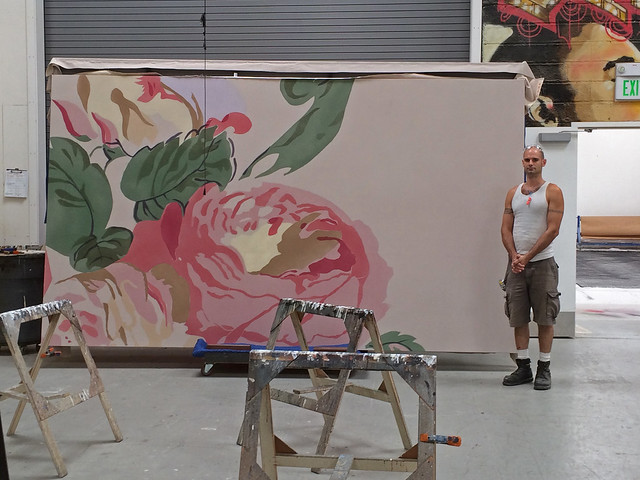
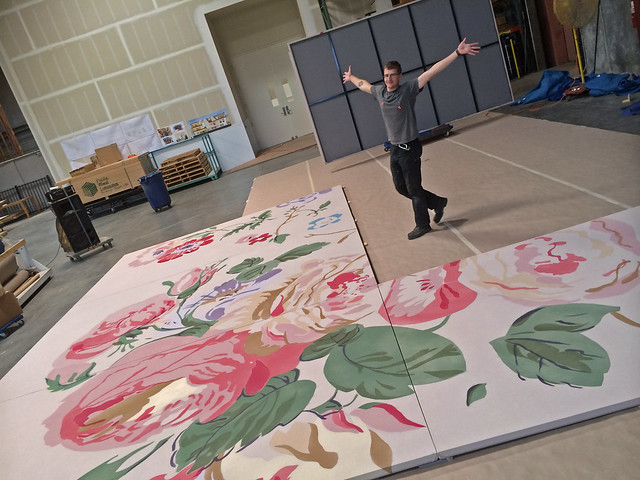
Patrick even obliged me by standing in this photos, to offer a human scale. Patrick is tall, and this panel is massive.
Once all six of the panels were stretched, they were test-fitted, to ascertain that the pattern actually worked.
Did I do the Dance of Joy? Were the muscles of my face aching from smiling? Yes. And yes.
There's actually a lot more that happens to this painting. And if you want to see it, you'll just to have to come see the show, An Audience with Meow Meow. It's going to be fabulous!
Let's say you woke up one morning, and said to yourself, "Self, I want to do a painting that looks like gigantic, oversized printed chintz fabric. I want the final product to be over twenty-five feet tall." How might you go about doing such a thing?
Well, if you were me, and you were in charge of painted scenery for a major regional theater, you would have to consider a lot of factors. You'd know that the final painting could not show a lot of brush-strokes, because that would not look "printed." You would realize that the painting would have to be built as multiple panels, because there's no truck (or lane of traffic) that could accommodate something this large. Breaking the painting up into pieces would be great for transport, but would mean that the image will have to be perfectly aligned, in order to not look stupid or amateurish. You would have to custom mix all of your own paint colors. And you would have to do all this on a really tight time-schedule.
Sounds like fun, doesn't it? Just my kind of project!
Here's how we did this painting for Berkeley Repertory Theatre.
First, we drew the entire image (provided to my studio by the scenic designer Neil Murray) in full scale. We wrapped the original image in plastic, and drew a grid on the protective wrapper. We then set to drawing, using vine charcoal in bamboo holders. We used a pre-printed gridded paper, which we set up on the studio floor. We walk on our drawings and paintings, because nobody wants to spend the day crawling around on the floor.
Once we had all the flowers drawn correctly, we went over the charcoal lines with magic markers. We used a variety of colors, to indicate the different parts of the painting. After the image was "inked in" we perforated all of our drawn lines with a "pounce wheel" a traditional tool, not unlike the tool used for transferring sewing patterns. (Click here for an image.) The pounce wheel is a wicked-looking device with rotating needles that prick tidy holes in paper. Once we had our drawing perforated, we rubbed powdered charcoal through the holes in the paper, and transferred our drawing onto other surfaces. In this project, we used the massive perforated paper known as a pounce or cartoon for two purposes. We used it to transfer the master drawing onto the fabric that would become the painted backdrop. We also used the perforated pounce to create custom stencils, which I'll talk about shortly.
I'd like to mention two things: First, if you look at the top of the photograph of the drawing on the brown paper, you'll see a standard sized bar/office stool. That gives you some sense of the scale of this project. Second, if you're curious about the history of the pounce, here's a link that shows this exact technique in use on the Sistine Chapel.
The next step was the preparation the fabric on which we would be painting. Because the image is so massive, we chose to lay the fabric on the floor of the studio. We just don't have walls tall enough to work on this size painting in an upright manner. Anyway, working on the floor has real advantages. You can reach any part of the painting without a ladder, and you're not fighting gravity.
I drew a series of boxes on our paper-covered studio floor. To be certain that everything was straight and even, I used the good old Pythagorean Theorem to ascertain the angles of my boundary boxes. I then stapled my fabric down to the floor, lining everything up with the boxes I'd just drawn. I had to keep even tension on the fabric to avoid wrinkles or puckering, so I stapled very methodically.
Next, I cooked up a five-gallon batch of cornstarch-and-water, to "size" the fabric, in order to make it a better painting surface. The "sizing" fills the weave of the fabric, which means that less paint will permeate the material. This in turn means that the final painting will be less stiff, less heavy, and less prone to cracking. I tinted the starch with some pink paint, so that I could see what I was doing. (Cooked corn starch is transparent, and it might as well be invisible.) Then I strained the starch solution through a paint strainer bag, poured it into a garden sprayer, and sprayed it onto my canvas. I built up many light layers, letting the fabric dry between passes. The starch tightened up the fabric, removing any hint of a wrinkle.
Next, I sprayed on several layers of custom-mixed paint, to build up the base layer of the painting. Again, I used a garden sprayer, of the sort you might use to apply fertilizer or insecticide in your home garden. The sprayer is like a gigantic air-brush, creating a beautifully smooth surface.
The object in the middle of the painting is the designer's model. Also notice the spray booth in the top left corner of the photograph. It is filled with gigantic hand-made "ostrich feathers" that are being treated with flame retardant chemicals. Our crew made over six hundred of these "feathers" out of custom-dyed fabric.
Color recipes were developed, based on the designer's original image.
The image was transferred onto the canvas, and paper stencils were created.
And then the real fun began! We started painting!
We'd line the stencil up with the charcoal image on the canvas, and then weigh the stencil down so that it wouldn't shift out of position. I used paint cans and those little glass "stones" used in flower arranging as stencil-weights.
I used a paint sprayer to apply the paint -- the kind used to paint automobiles. This worked beautifully with the paper stencils. I got a nice crisp image, and the stencils did not get over-saturated with paint.
We cut dozens of stencils.
At first, the painting looked like a collection of undiffferentiated blobs, but eventually the images began to emerge.
And while we were working on this, we also had to paint the structures that the painting would be stretched on. See those metal things on the sawhorses on the left side of the photograph? Those were constructed by the carpenters in our scenic studios.
Once the steel frames were painted with a rust-proof coating, we then had to paint a bunch of floor panels for one of our two theaters. We're all excellent multi-taskers, because there's so much to do, and such a tight schedule to adhere to.
Here's another photo that shows the scale of the project. Can you see Anya, pinning used stencils to the wall for safe-keeping? We had to stay organized, or we would have drowned in a pile of stencils.
Stencils were used repeatedly, to create multi-colored images. This is one of the many leaves on the painting. The polka-dots on the paper stencils are made by the weights that I mentioned earlier. The big circles are the paint cans, and the smaller dots are where the glass "stones" were weighing down the paper stencils. Everyone who visited the studio while we were working on this project was quite taken with the physical stencils. They were very interesting objects in their own right.
Here's the painting, almost finished. At this point, you can see the places where the fabric will be cut to wrap around the frames. I put a huge amount of effort into making certain that the pattern would line up correctly. This was one part of the project that I found particularly nerve-wracking. That, and the fact that every bit of paint we applied to the canvas had to be perfect. This was not a project we could make any mistakes on. If we screwed up, there was no going back.
No pressure, there.
Here's a view from the other side. One of the things that made this project fun, and which made it look so much like printed fabric were the places on the original image where the printing was a bit out of "register." If you look at some printed fabrics, you'll notice that the layers of printed color don't always line up perfectly. Sometimes one color is just a little bit "off." On this project, we carefully copied the inconsistencies of the original fabric, given to us by the designer. Oddly, making mistakes on purpose is actually quite difficult. We naturally want to "clean up" mistakes. But if we'd corrected all the oddities in the original image, I think our giant version would have lacked both charm and authenticity.
Once the paintings were finished, and carefully removed from the floor, they were handed over to the carpenters who attached them to their frames. I was terribly nervous during this process, as it was another thing that had to go absolutely perfectly. I tried not to hover, and I'm sure I made the carpenters a bit crazy, but in the end there was nothing to worry about. The carpentry staff at the Berkeley Repertory Theater is the best of the best.
Patrick even obliged me by standing in this photos, to offer a human scale. Patrick is tall, and this panel is massive.
Once all six of the panels were stretched, they were test-fitted, to ascertain that the pattern actually worked.
Did I do the Dance of Joy? Were the muscles of my face aching from smiling? Yes. And yes.
There's actually a lot more that happens to this painting. And if you want to see it, you'll just to have to come see the show, An Audience with Meow Meow. It's going to be fabulous!


Comments
Your planning and prep for this is amazing and the results are brilliant - I bet the audience won't give a thought of how it was done :-))))
As for the audiences not noticing -- I'm okay with that. I do to want them to "go home humming the scenery."
Lella